2016. 4. 6. 10:55ㆍMobile
Interactive Notification
iOS8부터 Interactive Notification 기능이 소개되었으며, 다음과 같이 Lock Screen, Banner, Notification Center에서 다음과 같이 Actionable Notification을 출력 수 있습니다. 이는 단순히 사용자에게 정보를 전달하는 것이 아니라 사용자에게 다음 행동을 유도할 수 있게 되었습니다.
일단 iOS8부터 소개된 Interaction Notification이 무엇인지 소개드립니다.
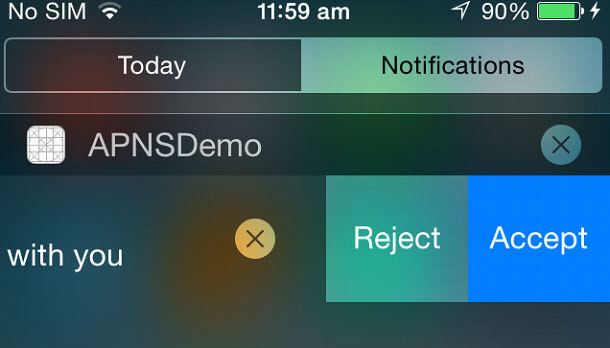
- Lock Screen: 다음과 같이 Lock Screen에 나타난 Notification을 왼쪽으로 스와이프 하시면 지정한 Action이 나타나게 할 수 있습니다.
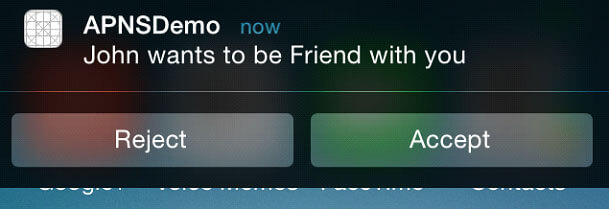
- Banner: 화면 상단에 나타나는 Banner은 아래로 스와이프 하시면 지정한 Action이 나타나게 할 수 있습니다.
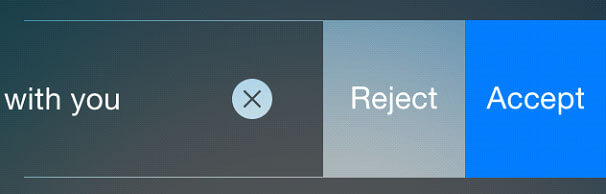
- Notification Center: Notification을 왼쪽으로 스와이프 하시면 특정 Action이 나타나게 할 수 있습니다.
- Modal Alert: 만약 Setting –> Notification –> App이름 –> Alert Style에서 Alert를 선택하시면, 다음과 같이 Banner대신 Alert가 나타납니다.
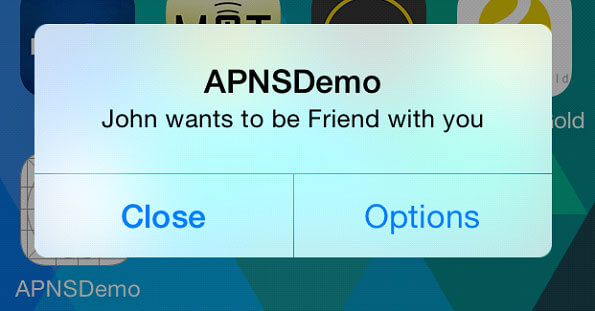
다음과같이 Select Options이 나타나게 할 수 도 있습니다.
구현방법
여기에서는 Xamarin을 기준으로 설명을 드립니다.
Interaction Notification 설정
Interactive Notification을 사용하시기 위해서는, 가장먼저 사용하실 Action(버튼을 말함)을 사전에 정의하여 Notification Setting에 전달해주어야 합니다. 여기서는 ‘좋아요’, ‘댓글달기’라는 2개의 버튼을 출력하는 것을 예제로 합니다.
if (UIDevice.CurrentDevice.CheckSystemVersion(8, 0))
{
    UIMutableUserNotificationAction acceptAction = new UIMutableUserNotificationAction();
    acceptAction.Title = "좋아요";
    acceptAction.Identifier = "MESSAGE_CATEGORY_LIKE";
    acceptAction.ActivationMode = UIUserNotificationActivationMode.Foreground;
    acceptAction.Destructive = false;
    acceptAction.AuthenticationRequired = false;

    UIMutableUserNotificationAction denyAction = new UIMutableUserNotificationAction();
    denyAction.Title = "댓글달기";
    denyAction.Identifier = "MESSAGE_CATEGORY_REPLY";
    denyAction.ActivationMode = UIUserNotificationActivationMode.Background;
    denyAction.Destructive = true;
    denyAction.AuthenticationRequired = false;

    UIMutableUserNotificationCategory acceptCategory = new UIMutableUserNotificationCategory();
    acceptCategory.Identifier = "MESSAGE_CATEGORY";
    acceptCategory.SetActions(new UIUserNotificationAction[] { acceptAction, denyAction }, UIUserNotificationActionContext.Minimal);
    NSSet categories = new NSSet(acceptCategory);

    var pushSettings = UIUserNotificationSettings.GetSettingsForTypes(
                            UIUserNotificationType.Alert
                            | UIUserNotificationType.Badge
                            | UIUserNotificationType.Sound,
                            categories);

    UIApplication.SharedApplication.RegisterUserNotificationSettings(pushSettings);
    UIApplication.SharedApplication.RegisterForRemoteNotifications();
}
else
{
    UIRemoteNotificationType notificationTypes = UIRemoteNotificationType.Alert
                                                | UIRemoteNotificationType.Badge
                                                | UIRemoteNotificationType.Sound;
    UIApplication.SharedApplication.RegisterForRemoteNotificationTypes(notificationTypes);
}
Interactive Notification은 iOS8부터 지원하기에 UIDevice.CurrentDevice.CheckSystemVersion을 통해서 버전별로 다르게 등록해주어야 합니다
IUMutableUserNotificationAction을 선언함으로써 버튼을 지정하실 수 있습니다.
- Identifier: 해당 버튼을 식별할 수 있는 유일한 문자열을 지정해줍니다.
- Title: 버튼의 Text입니다.
- ActivationMode: 버튼을 클릭했을 때 App 화면을 띄울지 여부입니다. foreground는 앱을 Active 상태로 만들며(화면을 띄운다는 이야기), background는 화면을 띄우지 않고 Background에서 작업을 진행하게 됩니다. Background에서 실행될 코드는 최대 30초의 시간제한을 가지며 30초가 지나면 자동으로 Background 작업은 강제종료됩니다.
- Destructive: 데이터 삭제 등 중요 작업을 실행하는 버튼이라면 true로 지정해주세요. 그럼 버튼이 붉게 강조되어 출력되며 사용자의 주의를 이끌 수 있습니다.
- Authentication: true로 설정할 경우, Lock Screen에서 사용자가 해당 Notification Action을 클릭하면 Passcord를 입력하도록 강제합니다. 이 기능은 Activation Mode가 background로 설정되어있고 Action의 작업이 파일들에 접근하는 등의 작업에서 유용합니다. 만약 Activation Mode가 foreground라면 Authentication의 값에 상관없이 passcord를 입력하도록 강제됩니다.
UIMutableUserNotificationCategory에 IUMutableUserNotificationAction를 설정해줌으로써 하나의 Actionable Notfication이 완성되게 됩니다.
- SetAction: Action을 지정합니다. UIUserNotificationActionContext.Default일 경우 Alert로 나타나며 4개까지 Action을 지원하며, UIUserNotificationActionContext.Minimal일 버튼으로 나타나며 2개 Action을 지원합니다.
- Identifier: 해당 Actionable Notification을 식별할 수 있는 유일한 문자열을 입력합니다.
Notification을 Push로 띄우기
다음과 같이 category에 UIMutableUserNotificationCategory의 Identifier로 지저하신 문자열을 지정하시면 해당 Notification이 나타납니다. (여기서는 MESSAGE_CATEGORY)
{
"aps":
{
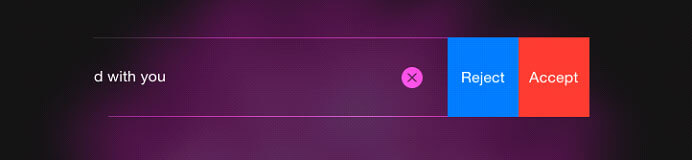
"alert": "John wants to be Friend with you",
"category" : "MESSAGE_CATEGORY"
...
}
...
}
Action Event 처리하기
버튼이 클릭되었을 때 실행될 동작은 다음과 같이 지정하시면 됩니다. 위에서 지정하신 UIMutableUserNotificationAction의 Identifier를 통해서 어떤 버튼이 클릭되었는지 파악하게 됩니다.
public override void HandleAction(UIApplication application, String identifier, UILocalNotification notification, Action completionHandler)
{
    if (identifier.Equals("MESSAGE_CATEGORY_LIKE"))
    {
        //코드작성
    }

    completionHandler();
}
References
'Mobile' 카테고리의 다른 글
| [Xamarin] Animation (0) | 2016.04.23 |
|---|---|
| [Xamarin] iOS 파일시스템 (1) | 2016.04.07 |
| [GCM] GCM Message Parameter (JSON) (0) | 2016.04.06 |
| [Xamarin] Push Notification in iOS (0) | 2016.04.04 |
| [Xamarin] Event를 Command로 단순화 하기 (0) | 2016.04.03 |